
why make this recipe
Making DIY Vertical Hanging Jar Planters is a fun and creative way to add greenery to your space. These planters save space and allow you to grow herbs, flowers, or small plants in an attractive way. They are perfect for small apartments, balconies, or even indoor areas with limited space. Plus, they make a unique decorative piece that can brighten up any room.
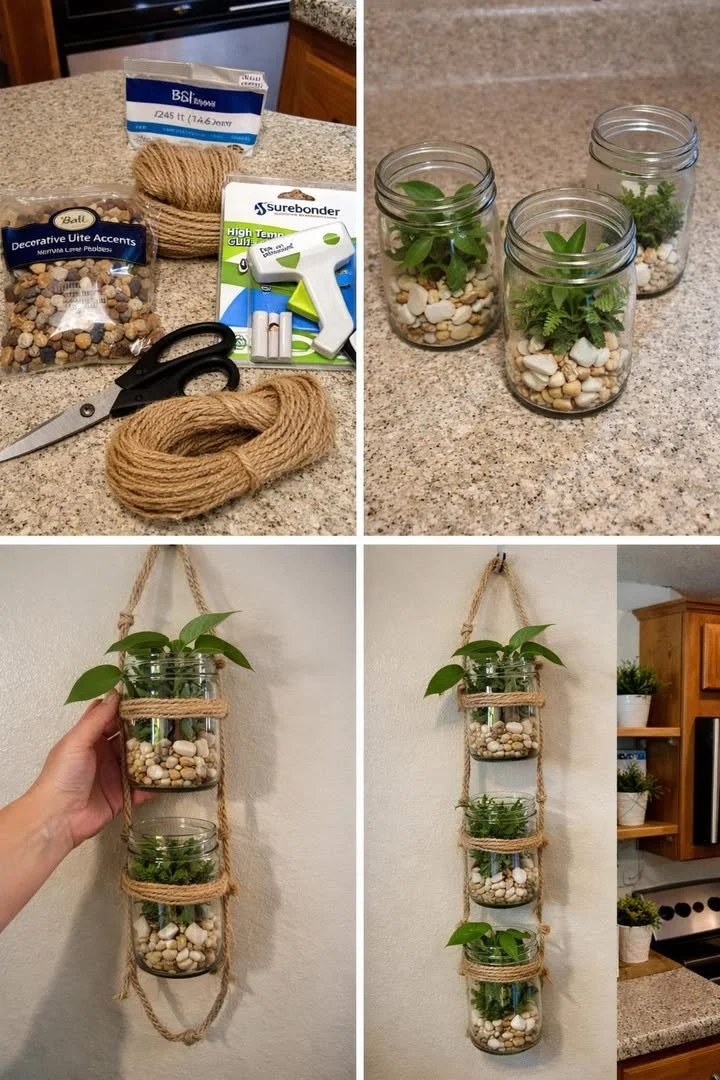
how to make DIY Vertical Hanging Jar Planters
Ingredients:
- Glass jars (mason jars work well)
- Strong rope or twine
- Wood plank or sturdy board
- Wood screws or hooks
- Potting soil
- Plants or seeds of your choice
Directions:
- Start by preparing your wood plank. This will be the base for your hanging jars.
- Measure and mark where you want to place each jar on the plank. Ensure they are evenly spaced.
- Use wood screws or hooks to secure the jars to the plank. Make sure they are firmly attached.
- Cut your rope or twine into equal lengths. You will need two pieces for each jar.
- Tie a knot at one end of each piece of rope. Place the jars upside down and thread the rope through their top.
- Once all jars are secured, tie the other end of the rope to the plank.
- Flip your wood plank upright and hang it on the wall or a secure area.
- Fill each jar with potting soil and plant your seeds or small plants.
- Water the plants according to their needs and enjoy your new vertical garden.
how to serve DIY Vertical Hanging Jar Planters
These hanging jar planters can be served by showcasing them on your wall. They make a beautiful display in any room, and you can enjoy watching your plants grow. Use herbs from your jars when cooking or simply admire the blooms.
how to store DIY Vertical Hanging Jar Planters
Since these planters are hung on a wall, you don’t need to store them in a traditional way. However, if you need to take them down, keep the plants in a cool, dry place until you can rehang them. Ensure they receive enough light while waiting.
tips to make DIY Vertical Hanging Jar Planters
- Choose plants that do well in small spaces, like herbs or succulents.
- Use jars of different sizes for a more interesting look.
- Consider adding decorative paint to your jars for added style.
- Make sure not to overcrowd the jars with too many plants.
variation
You can customize your vertical hanging jars by using different types of containers, such as metal cans or plastic bottles. You can also choose to paint or decorate them in a theme that matches your home decor.
FAQs
Q: What type of plants can I use in my vertical hanging jar planters?
A: You can use herbs like basil and mint, small flowers, or even succulents.
Q: How do I water the plants in my hanging jars?
A: Water them gently using a spray bottle or a watering can with a narrow spout to avoid excessive water running down.
Q: Can I use recycled jars for this project?
A: Yes! Recycled jars not only save money but also create a unique and personalized look for your planters.

DIY Vertical Hanging Jar Planters
Ingredients
Method
- Start by preparing your wood plank; this will serve as the base for your hanging jars.
- Measure and mark where you want to place each jar on the plank; ensure they are evenly spaced.
- Use wood screws or hooks to secure the jars to the plank; make sure they are firmly attached.
- Cut your rope or twine into equal lengths, with two pieces needed for each jar.
- Tie a knot at one end of each piece of rope, then thread the rope through the top of each upside-down jar.
- Once all jars are secured, tie the other end of the rope to the wood plank.
- Flip the wood plank upright and hang it on the wall or a secure area.
- Fill each jar with potting soil and plant your seeds or small plants.
- Water the plants according to their needs and enjoy your new vertical garden.