

why make this recipe
DIY Hanging Bottle Face Planters are a fun and creative way to add charm to your home or outdoor space. This project is not only eco-friendly, as it recycles plastic bottles, but also allows you to express your artistic side. You can customize each planter with colors and designs that suit your taste. Plus, they make great conversation starters and are perfect for adding a bit of greenery to any area!
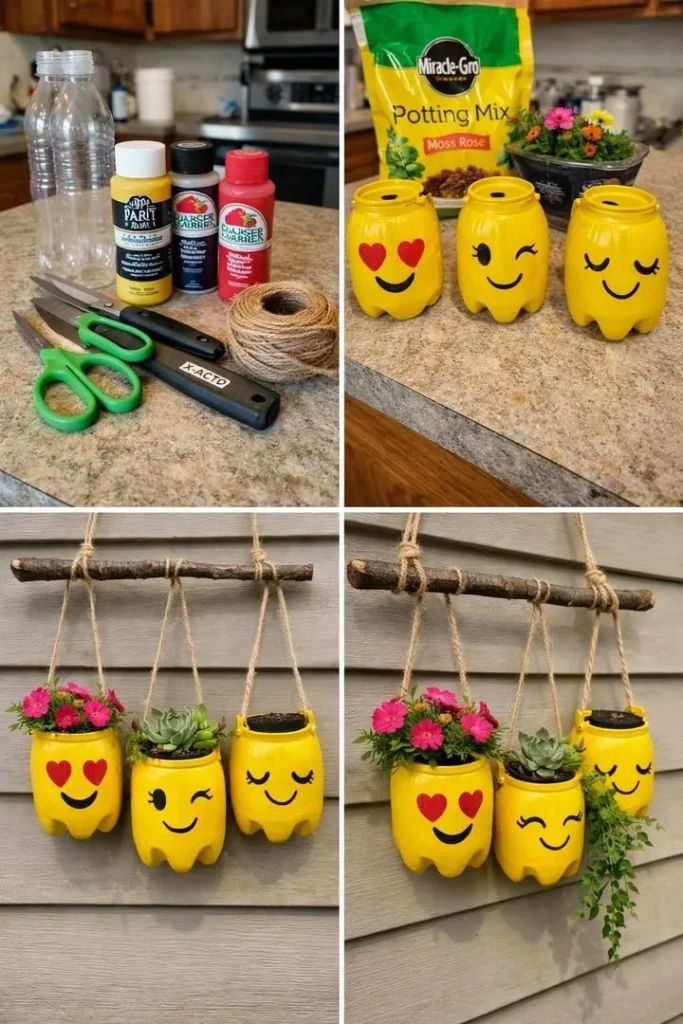
how to make DIY Hanging Bottle Face Planters
Ingredients:
- Empty plastic bottles
- Acrylic paint
- Paint brushes
- Scissors or craft knife
- Rope or strong thread
- Wooden stick or branch
- Soil
- Small flowers or plants
- Nail or drill for holes
- Clear sealer (optional)
Directions:
- Prepare the Bottles: Wash and dry the bottles. Cut the bottom portion open to create the planter opening, keeping the bottle cap attached.
- Paint the Bottles: Paint the bottles bright yellow or any fun color. Let the paint dry fully, adding a second coat for better coverage.
- Draw the Faces: Use black and red paint or markers to create faces like smiley faces and winking faces. Let dry completely.
- Make Hanging Holes: Create two holes near the top sides of each bottle and thread the rope through the holes, tying knots securely.
- Prepare the Hanging Branch: Use a wooden stick or tree branch and tie each planter at different heights for a playful look.
- Add Soil and Plants: Fill with potting soil and small flowers, moss rose, succulents, or tiny trailing plants.
- Hang the Display: Hang on balcony walls, garden spaces, patios, or kids’ play areas. Optional ideas include using glow paint, adding names or emojis, painting rainbow colors, or adding beads to the ropes.
how to serve DIY Hanging Bottle Face Planters
These planters are great for brightening up your space. Hang them in areas where they can be admired by guests, or place them in children’s play areas to add fun decorations. Your lush plants will thrive in these colorful face planters, creating a lively atmosphere.
how to store DIY Hanging Bottle Face Planters
If you need to store your hanging planters, keep them out of direct sunlight to avoid fading and damage to the paint. You can place them in a cool, dry area until you are ready to display them again. Ensure the plants are watered if you plan to keep them stored for a short time.
tips to make DIY Hanging Bottle Face Planters
- Use vibrant colors to make your planters stand out.
- Ensure the planters have drainage holes at the bottom if you want to keep the soil moist.
- Consider adding small decorative stones or beads in the soil for extra flair.
- Personalize each planter with unique designs or by using different plant varieties.
variation
For a seasonal touch, you can decorate your planters for different holidays. Use themes like spooky faces for Halloween or festive colors for Christmas. You could also use larger bottles for bigger plants or herbs, expanding your garden display.
FAQs
Q: Can I use any type of plastic bottle for this project?
A: Yes, you can use any plastic bottle. Just ensure it is clean and dry before starting.
Q: What types of plants work best for these planters?
A: Small flowers, succulents, moss rose, and tiny trailing plants work best due to their size and low maintenance needs.
Q: How can I make my planters weather-resistant?
A: Use a clear sealer on the paint to protect it from the elements, especially if you plan to hang them outdoors.
DIY Hanging Bottle Face Planters
Ingredients
Method
- Wash and dry the bottles.
- Cut the bottom portion of the bottles open to create the planter opening, keeping the bottle cap attached.
- Paint the bottles bright yellow or any fun color.
- Let the paint dry fully, adding a second coat for better coverage.
- Use black and red paint or markers to create faces like smiley faces and winking faces.
- Let dry completely.
- Create two holes near the top sides of each bottle.
- Thread the rope through the holes, tying knots securely.
- Use a wooden stick or tree branch to hang the planters.
- Tie each planter at different heights for a playful look.
- Fill the bottles with potting soil.
- Add small flowers, moss rose, succulents, or tiny trailing plants.
- Hang the planters on balcony walls, garden spaces, patios, or kids’ play areas.