
why make this recipe
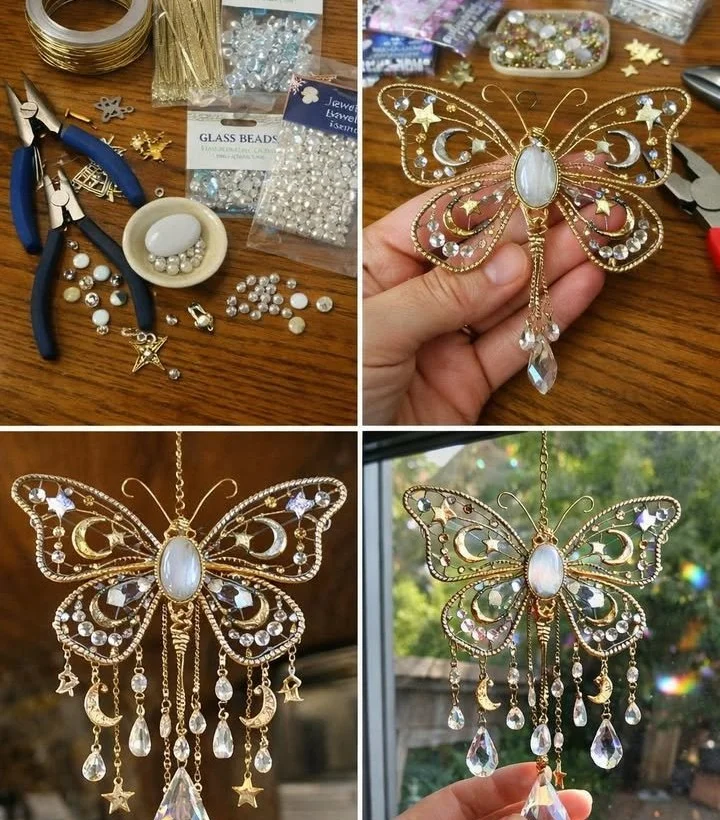
Creating a DIY Celestial Butterfly Sun Catcher is a fun and creative way to bring a touch of nature indoors. This project is not only a wonderful craft for kids and adults alike, but it also adds beauty to your home. When sunlight hits the sun catcher, it creates beautiful colors and patterns, filling your space with light. Plus, making it yourself can be a rewarding and personal touch to your home decor.
how to make DIY Celestial Butterfly Sun Catcher
Ingredients :
- Clear plastic sheets or a clear CD case
- Butterfly template (you can find free templates online)
- Permanent markers or paint
- Scissors
- String or fishing line
- Glue (optional, for additional decorations)
- Optional glitter or sequins for extra sparkle
Directions :
- Start by printing or drawing a butterfly template on paper. Cut it out to use as a stencil.
- Place the butterfly template under a clear plastic sheet or a clear CD case.
- Use permanent markers or paint to trace the butterfly shape. You can use different colors for a vibrant look.
- Once you’re happy with the design, let it dry completely.
- Carefully cut out the butterfly shape from the plastic.
- If you want to add some glitter or sequins, apply a bit of glue and sprinkle them on the wet glue.
- Cut a piece of string or fishing line and tie it at the top of the butterfly for hanging.
- Find a sunny spot to hang your sun catcher.
how to serve DIY Celestial Butterfly Sun Catcher
Although this isn’t a food recipe to serve, you can display your DIY Celestial Butterfly Sun Catcher in a window or any area where sunlight can shine through. It will create a dazzling effect, lighting up your room with colorful reflections.
how to store DIY Celestial Butterfly Sun Catcher
If you need to store your sun catcher, gently place it in a box or on a shelf where it won’t get squished or damaged. Avoid stacking items on top of it to keep it in good shape. You can also use a soft cloth to wrap it for extra protection.
tips to make DIY Celestial Butterfly Sun Catcher
- Choose bright colors to make your sun catcher pop in the sunlight.
- Try using different shapes and sizes for a unique display.
- If using glitter, fine glitter works best for an even sparkle.
- Experiment with the placement of your sun catcher to find the best lighting.
variation
You can create different designs for your sun catchers using other shapes like flowers, stars, or moons. Mixing and matching shapes will create a lovely celestial theme in your decor.
FAQs
Can I use regular paper instead of plastic sheets?
Regular paper won’t hold up well. It’s best to use clear plastic sheets or a clear CD case for maximum light diffusion.
How long does it take to dry?
It usually takes a few hours for the paint or markers to dry completely, depending on how thickly you applied them.
Can I hang it outside?
While you can hang it outside, keep in mind that rain or extreme weather can damage it. It’s better suited for indoor use or covered porches.
DIY Celestial Butterfly Sun Catcher
Ingredients
Method
- Start by printing or drawing a butterfly template on paper. Cut it out to use as a stencil.
- Place the butterfly template under a clear plastic sheet or a clear CD case.
- Use permanent markers or paint to trace the butterfly shape. You can use different colors for a vibrant look.
- Once you are happy with the design, let it dry completely.
- Carefully cut out the butterfly shape from the plastic.
- If you want to add some glitter or sequins, apply a bit of glue and sprinkle them on the wet glue.
- Cut a piece of string or fishing line and tie it at the top of the butterfly for hanging.
- Find a sunny spot to hang your sun catcher.