
why make this recipe
DIY Butterfly Sun Catchers are a fun and easy craft project. They bring a splash of color to your home and make great decorations. These beautiful sun catchers can brighten up any window and are a wonderful way to enjoy the beauty of butterflies, especially during sunny days. This craft is perfect for kids and adults alike, making it a great family activity. Plus, you can use materials you already have at home, making it budget-friendly too!
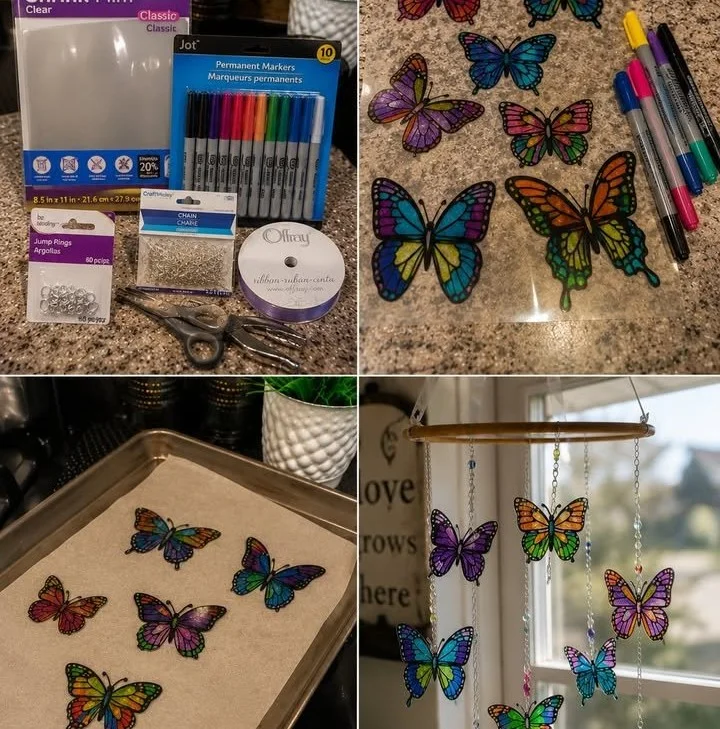
how to make DIY Butterfly Sun Catchers
Ingredients:
- Transparent plastic sheets or contact paper
- Colored markers or crayons
- Scissors
- Butterfly templates (optional)
- String or yarn for hanging
- Tape
Directions:
- Start by choosing a butterfly template or drawing your own butterfly shape on the transparent plastic sheet.
- Use colored markers or crayons to decorate the butterfly. Be as creative as you like with colors and patterns.
- Once you finish coloring, carefully cut out the butterfly shape with scissors.
- If you used contact paper, peel off one side to make it sticky. If using plastic sheets, you can use tape to secure the butterfly.
- Place another sheet of contact paper over the butterfly to seal in your design. Press it down firmly to avoid bubbles.
- Cut out the butterfly again, leaving a small edge around the design if you want to.
- Use string or yarn to create a hanger. Tape the top of the butterfly to the string.
- Find a sunny window, and hang your beautiful butterfly sun catcher.
how to serve DIY Butterfly Sun Catchers
To display your DIY Butterfly Sun Catchers, simply hang them in any window that receives sunlight. This allows the colors to shine and reflect beautifully, enhancing your home’s atmosphere. You can make a collection with different colors and designs to create a stunning display.
how to store DIY Butterfly Sun Catchers
When not in use, store your butterfly sun catchers in a flat container or between sheets of paper to prevent them from getting damaged. Keep them in a cool, dry place away from direct sunlight to maintain their colors.
tips to make DIY Butterfly Sun Catchers
- Use bright colors to make your butterflies pop in the sunlight.
- Experiment with different designs or patterns using glitter or stickers for added flair.
- If children are making these, ensure they use kid-friendly materials and always supervise them during the cutting process.
variation
You can try making sun catchers in different shapes like flowers or birds. Just follow the same steps and change the design. Another fun variation is to use nature materials like pressed flowers or leaves for a unique look.
FAQs
Q: Can I use regular paper instead of plastic?
A: Regular paper will not work well for sun catchers because it does not let light through. Use transparent plastic or contact paper for best results.
Q: How can I clean the sun catchers?
A: Wipe them gently with a damp cloth to remove any dust or dirt. Avoid using harsh chemicals that can ruin the colors.
Q: How long do these sun catchers last?
A: If kept away from direct sunlight when not on display, these sun catchers can last for many months. Sunlight may fade the colors over time, so be aware of that.
DIY Butterfly Sun Catchers
Ingredients
Method
- Start by choosing a butterfly template or drawing your own butterfly shape on the transparent plastic sheet.
- Use colored markers or crayons to decorate the butterfly. Be as creative as you like with colors and patterns.
- Carefully cut out the butterfly shape with scissors.
- If you used contact paper, peel off one side to make it sticky. If using plastic sheets, you can use tape to secure the butterfly.
- Place another sheet of contact paper over the butterfly to seal in your design. Press it down firmly to avoid bubbles.
- Cut out the butterfly again, leaving a small edge around the design if desired.
- Use string or yarn to create a hanger and tape the top of the butterfly to the string.
- Find a sunny window and hang your beautiful butterfly sun catcher.