
why make this recipe
DIY Fairy Wing Butterfly Earrings are a fun and magical project. They allow you to create beautiful accessories that you can wear or give as gifts. Making these earrings yourself adds a personal touch, and you can customize them to match your style. Using colorful materials lets your creativity shine. Plus, crafting these earrings is a great way to spend time and enjoy yourself.
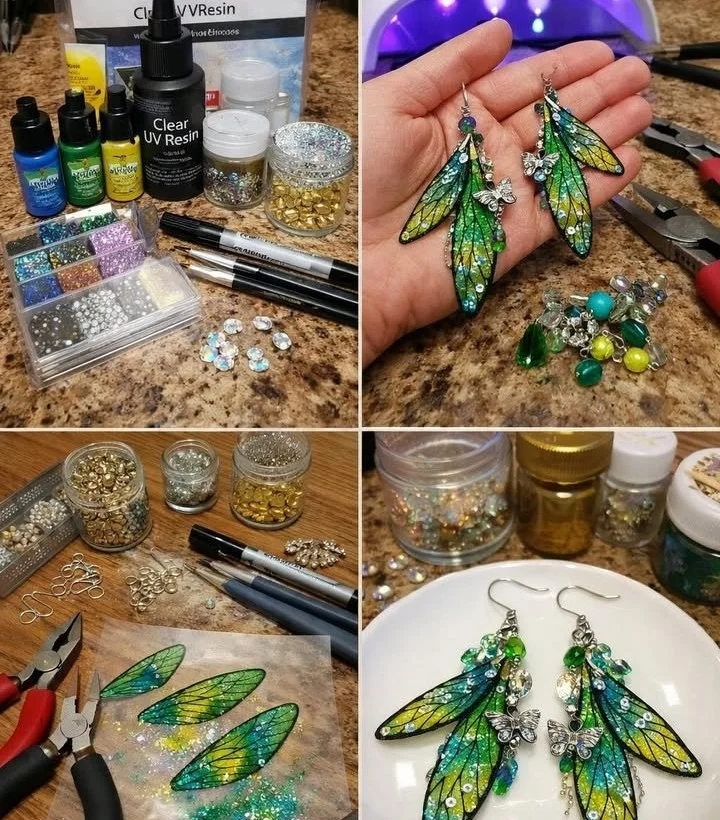
how to make DIY Fairy Wing Butterfly Earrings
Ingredients :
- Transparent plastic sheet or clear UV resin
- Alcohol ink or transparent paint (green, blue, yellow)
- Fine glitter
- Thin black paint pen or marker
- Earring hooks
- Jump rings
- Head pins
- Jewelry wire
- Crystal beads
- Small butterfly charms
- Seed beads
- Optional: Gold foil, rhinestones, iridescent powder, metallic paint
Directions :
- Draw long fairy-wing shapes onto transparent plastic or resin and cut out matching wings.
- Blend transparent inks for color and add glitter.
- Draw veins with the paint pen.
- Seal wings with UV resin or varnish.
- Thread beads onto head pins and wrap wire loops, attach to wings.
- Create the earring top with charms and beads.
- Connect earrings to hooks and tighten.
how to serve DIY Fairy Wing Butterfly Earrings
These earrings make a lovely addition to any outfit. They can be worn for special occasions, casual outings, or even for fun at home. Pair them with a simple top or dress to let the earrings stand out. They also make great gifts for friends or family who love unique jewelry pieces.
how to store DIY Fairy Wing Butterfly Earrings
To keep your earrings in good condition, store them in a cool, dry place. A small jewelry box or a soft cloth pouch can protect them from scratches and dust. Avoid exposing them to direct sunlight for long periods, as this can affect the colors.
tips to make DIY Fairy Wing Butterfly Earrings
- Work in a well-lit area to see colors and details clearly.
- Experiment with different colors and patterns to make each pair unique.
- Make extra wings; practice drawing before cutting.
- Use a clear coat to protect the paint and glitter from chipping.
variation
You can create variations of these earrings by using different shapes, adding more charms, or layering wings for a 3D effect. Try using different colors or materials like metal or wood to change the style.
FAQs
Q: Can I use other colors instead of green, blue, and yellow?
A: Yes, feel free to use any colors you like! Mix and match to create your perfect fairy wings.
Q: Is it necessary to use UV resin?
A: No, you can use a transparent plastic sheet or a clear varnish if you prefer not to use UV resin.
Q: How long do these earrings take to make?
A: Making the earrings can take about 1-2 hours, depending on your crafting speed and drying time for the resin or varnish.
Fairy Wing Butterfly Earrings
Ingredients
Method
- Draw long fairy-wing shapes onto the transparent plastic or resin and cut out matching wings.
- Blend transparent inks for color and add fine glitter to the wings.
- Use the paint pen to draw veins on the wings.
- Seal the wings with UV resin or varnish for durability.
- Thread beads onto head pins and wrap wire loops, then attach to the wings.
- Create the earring top by attaching charms and additional beads.
- Connect the earrings to hooks and tighten securely.