
why make this recipe
Creating DIY Crystal Beaded Dragonfly Ornaments is a fun and creative activity. These beautiful ornaments add a touch of charm to your home or garden, especially during the spring and summer months. Not only are they visually appealing, but they also make great gifts for friends and family. Plus, making them is a wonderful way to relax and express your artistic side.
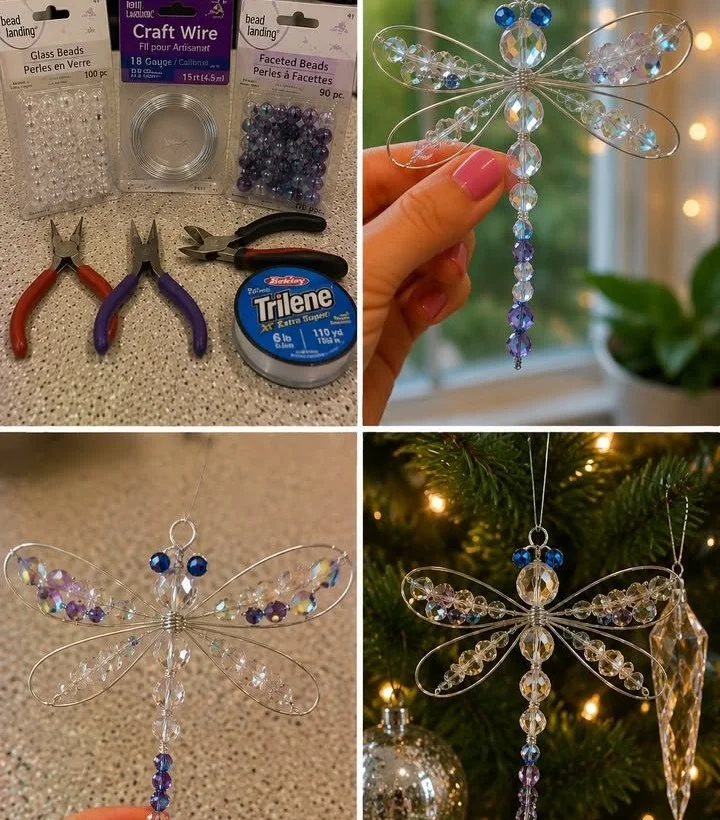
how to make DIY Crystal Beaded Dragonfly Ornaments
Ingredients :
- Silver craft wire or memory wire
- Clear crystal beads
- Small colored beads
- Jewelry pliers
- Wire cutters
- Jump rings (optional)
- Fishing line or ornament hooks
Directions :
- Cut a long piece of wire and thread crystal beads onto the center to form the body.
- Use the remaining wire to create loops for the wings and twist where they meet the body.
- Thread small colored beads for accents and secure the wire ends.
- Tighten the wire twists and adjust the wing shapes.
- Form a small loop at the top for hanging and attach fishing line or hooks.
Optional: You can add pearl beads, glitter wire, rainbow crystals, tiny bells, or fairy lights for extra decoration.
how to serve DIY Crystal Beaded Dragonfly Ornaments
Hang your crystal beaded dragonflies in windows, on tree branches, or from hooks inside your home. They also look lovely when displayed on a wall or as part of a centerpiece for a garden party. Their sparkle adds a magical touch wherever you choose to place them.
how to store DIY Crystal Beaded Dragonfly Ornaments
To store your dragonfly ornaments, place them in a box or a soft pouch to prevent damage. Keep them in a cool, dry place away from direct sunlight to maintain their colors and sparkle.
tips to make DIY Crystal Beaded Dragonfly Ornaments
- Use a variety of colors for the beads to make your dragonflies more vibrant.
- Experiment with different wire types to see which one you like best.
- Make a bunch of them in various sizes for a charming display.
- Consider adding a personal touch, like initials or small charms, to each ornament.
variation
You can create dragonflies of different sizes by adjusting the length of the wire and the number of beads used. Another variation is to create themed ornaments, like seasonal colors for holidays.
FAQs
Q: Can I use different types of beads?
A: Yes! You can use wooden, acrylic, or glass beads for different textures and looks.
Q: How long does it take to make one ornament?
A: It typically takes about 30 minutes to an hour to complete one dragonfly, depending on your skill level.
Q: Is this project suitable for kids?
A: Yes, with supervision, children can help thread the beads and twist the wire, making it a fun family activity.
DIY Crystal Beaded Dragonfly Ornaments
Ingredients
Method
- Cut a long piece of wire and thread crystal beads onto the center to form the body.
- Use the remaining wire to create loops for the wings and twist where they meet the body.
- Thread small colored beads for accents and secure the wire ends.
- Tighten the wire twists and adjust the wing shapes.
- Form a small loop at the top for hanging and attach fishing line or hooks.