
Why Make This Recipe
Creating a decorative "floating teapot" wreath is a fun and unique way to add charm to your home. This whimsical piece not only brightens up your walls but also makes a fantastic conversation starter. Whether you are a tea lover, enjoy crafting, or just want to showcase something original, this wreath is perfect for you.
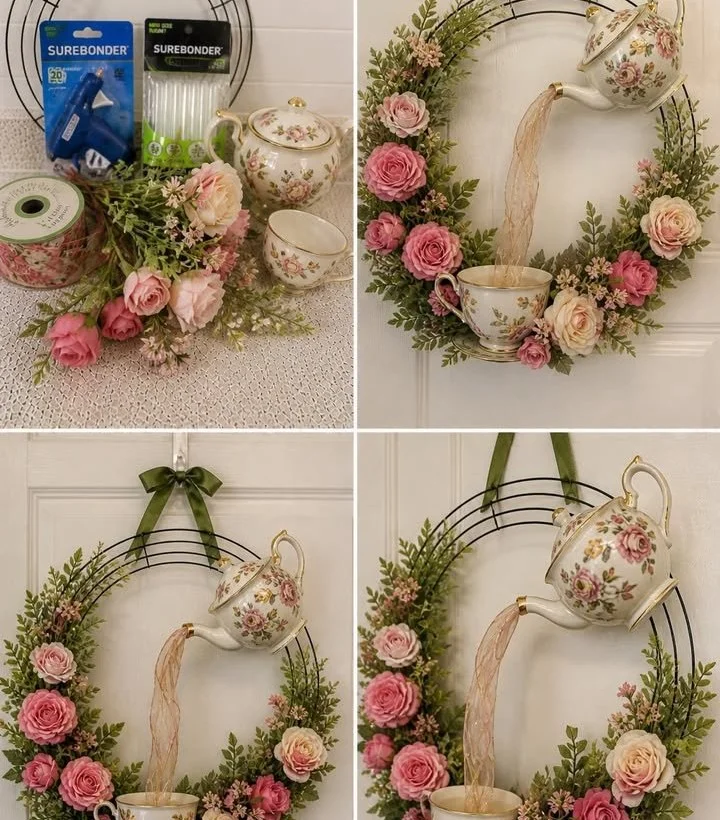
How to Make Decorative “Floating Teapot” Wreath
Creating this beautiful piece is easier than it looks! With just a few materials and some creativity, you can make a stunning wreath that gives the illusion of tea pouring from a teapot into a cup.
Ingredients:
- A decorative teapot (choose one that you love)
- A matching teacup
- Floral foam or a foam ring
- Artificial flowers (in colors of your choice)
- Greenery (like faux leaves or herbs)
- Twine or ribbon for hanging
- Hot glue gun and glue sticks
- Scissors
Directions:
-
Prepare the Base: Begin by cutting the floral foam or preparing the foam ring. This will be the base of your wreath.
-
Attach the Teapot: Secure the teapot to the top of the foam using the hot glue. Make sure it is stable and positioned so that it appears to be pouring.
-
Add the Teacup: Position the teacup below the teapot, gluing it into place as well. Ensure it is slightly tilted to enhance the pouring effect.
-
Decorate with Flowers: Use artificial flowers to fill in around the teapot and teacup. Glue them to the foam for a colorful and vibrant look.
-
Add Greenery: Place faux leaves or herbs around the flowers and teapot to create a natural feel.
-
Finalize the Wreath: Once you’re happy with the arrangement, allow it to dry completely. Add a piece of twine or ribbon at the top for hanging.
-
Display Your Creation: Hang your wreath on a wall, door, or wherever you want to showcase it!
How to Serve Decorative “Floating Teapot” Wreath
This wreath is meant for display, not for serving food. Hang it in your kitchen, dining room, or any other space to enhance your home decor.
How to Store Decorative “Floating Teapot” Wreath
To store your wreath, find a cool, dry place away from direct sunlight. Avoid crushing the flowers and greenery by keeping it flat or in a protective box.
Tips to Make Decorative “Floating Teapot” Wreath
- Choose a teapot and teacup that contrast well for a more eye-catching look.
- Mix different types of flowers and greenery for texture.
- If using ribbon, pick a style that complements your color scheme.
- Let the hot glue cool a bit before using it to prevent burns.
Variation
Consider using seasonal colors and themes! In autumn, you can use oranges and browns; for spring, try bright pastels. You can also change the teapot shape or size for a different effect.
FAQs
-
Can I use real flowers instead of artificial ones?
Yes, but real flowers will wilt and may not hold up as well over time. -
How long does it take to make this wreath?
It typically takes about 1-2 hours, depending on your skill level and how detailed you want to be. -
Where can I hang the wreath?
You can hang it indoors in a dining room, kitchen, or living room, or even outdoors under a covered porch.
By following these simple steps and tips, you can create a delightful decorative "floating teapot" wreath that adds a touch of magic to your space! Enjoy your crafting!
Decorative Floating Teapot Wreath
Ingredients
Method
- Begin by cutting the floral foam or preparing the foam ring. This will be the base of your wreath.
- Secure the teapot to the top of the foam using the hot glue. Make sure it is stable and positioned so that it appears to be pouring.
- Position the teacup below the teapot, gluing it into place as well. Ensure it is slightly tilted to enhance the pouring effect.
- Use artificial flowers to fill in around the teapot and teacup. Glue them to the foam for a colorful and vibrant look.
- Place faux leaves or herbs around the flowers and teapot to create a natural feel.
- Once you’re happy with the arrangement, allow it to dry completely. Add a piece of twine or ribbon at the top for hanging.
- Hang your wreath on a wall, door, or wherever you want to showcase it!