
introduction
The DIY Ribbon Jellyfish Hanging Craft is a fun and easy project that brings a splash of color and creativity to any space. This delightful craft is perfect for children and adults alike, making it a great activity for family gatherings or a crafty afternoon.
why make this recipe
Creating this craft allows you to express your artistic side while also recycling materials you might already have at home. It also encourages fine motor skills in children, making it a wonderful educational activity. Plus, the finished jellyfish look cute and can brighten up a room!
how to make DIY Ribbon Jellyfish
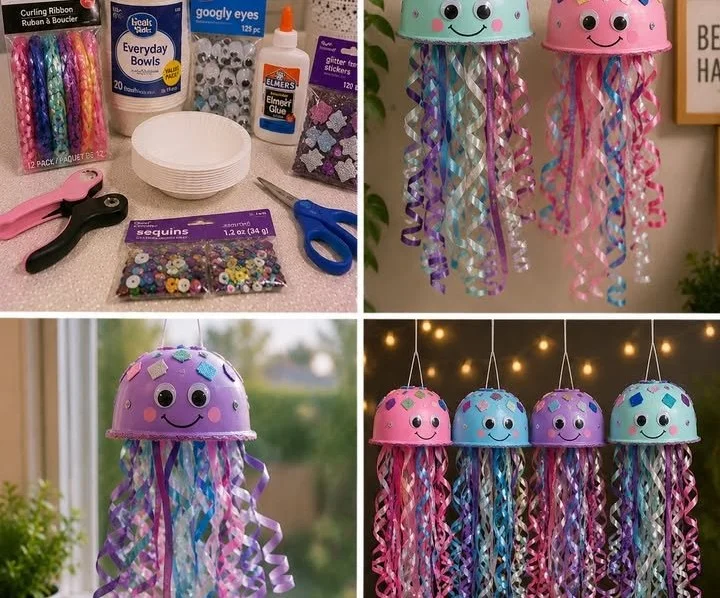
Ingredients:
- Colorful ribbons (various lengths)
- A plastic or paper bowl
- Googly eyes
- Glue
- Scissors
- String or fishing line (for hanging)
Directions:
- Start by cutting your ribbons into long strips, about 12-15 inches each. You can use different colors and styles to make your jellyfish vibrant.
- Take the bowl and flip it upside down. This will be the body of your jellyfish.
- Begin gluing the ribbons onto the bottom of the bowl. Make sure they hang down evenly around the sides.
- Once all ribbons are attached, allow the glue to dry for a few minutes.
- Next, stick the googly eyes onto the bowl, which will be the jellyfish’s "face."
- Finally, cut a piece of string or fishing line and glue it to the top center of the bowl. This will be used to hang your jellyfish.
how to serve DIY Ribbon Jellyfish
You can hang your Ribbon Jellyfish from the ceiling, in a window, or even on a wall. They look great as part of a room decor and can also be used for themed parties, like an ocean or sea creature party.
how to store DIY Ribbon Jellyfish
If you need to store your jellyfish craft, gently place it in a box or on a shelf to avoid crushing the ribbons. Make sure it is in a dry area to keep it in good condition.
tips to make DIY Ribbon Jellyfish
- Use various textures of ribbons, like satin or burlap, for a unique look.
- Add other decorative elements, like glitter or stickers, to personalize your jellyfish.
- Consider using glow-in-the-dark ribbons or paint to create a jellyfish that shines at night!
variation
You can make mini jellyfish by using smaller bowls and shorter ribbons. This could be a fun option for a mobile or as party favors.
FAQs
Q: Can I make this craft outdoors?
A: Yes! Just ensure that you have a flat surface to work on, and be careful with gluing if it’s windy.
Q: How long does it take to make the jellyfish?
A: The whole process usually takes about 30-45 minutes, including drying time for the glue.
Q: Is this craft safe for young children?
A: Yes, but it’s best for kids to be supervised while using scissors and glue. Adjust the size of the ribbon strips for safety.
DIY Ribbon Jellyfish
Ingredients
Method
- Start by cutting your ribbons into long strips, about 12-15 inches each.
- Take the bowl and flip it upside down to serve as the body of your jellyfish.
- Glue the ribbons onto the bottom of the bowl, ensuring they hang down evenly around the sides.
- Allow the glue to dry for a few minutes.
- Stick the googly eyes onto the bowl to create the jellyfish's face.
- Cut a piece of string or fishing line and glue it to the top center of the bowl for hanging.