
why make this recipe
Creating a DIY Butterfly Crystal Sun Catcher is a fun and simple craft project that brightens up any space. These beautiful sun catchers reflect sunlight in a way that creates a dazzling display on your windows and walls. Not only does it add a touch of nature’s beauty indoors, but it also encourages creativity and can be a delightful activity for the whole family.
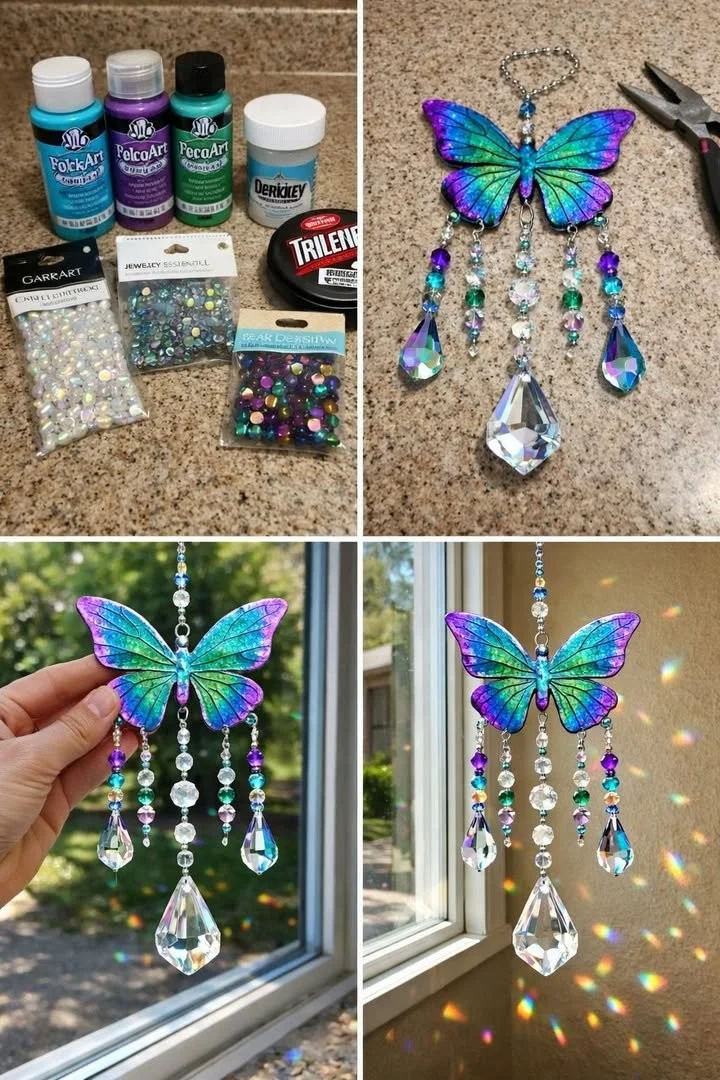
how to make DIY Butterfly Crystal Sun Catcher
Ingredients:
- Clear glue
- Liquid food coloring (various colors)
- Plastic butterfly molds
- Plastic wrap
- A flat surface for drying
- Scissors (if needed)
Directions:
- Start by laying down the plastic wrap on a flat surface. This will make it easy to remove your sun catchers once they are dry.
- In a bowl, pour clear glue. Add a few drops of liquid food coloring to it, mixing well until you reach your desired color. You can create different colors for a colorful effect.
- Carefully pour the colored glue into the butterfly molds. Make sure to fill each mold evenly and avoid overflow.
- Allow the glue to dry completely. This usually takes about 24 hours, but check the glue packaging for specific drying times.
- Once dry, gently peel the sun catchers off the molds and remove any excess plastic wrap.
- Your Butterfly Crystal Sun Catcher is ready to hang! Use string or a suction cup hook to display it in a sunny window.
how to serve DIY Butterfly Crystal Sun Catcher
While sun catchers aren’t food, they are excellent decorative pieces! Hang them on windows or in areas where they can catch sunlight. This will enhance their beauty and cast colorful reflections around your home, making for a cheerful atmosphere.
how to store DIY Butterfly Crystal Sun Catcher
When not in use or if you want to keep them safe, store the sun catchers in a box or container. Make sure to wrap them gently in tissue paper to prevent scratches or breakage. Keep them in a cool, dry place, away from direct sunlight to preserve their colors.
tips to make DIY Butterfly Crystal Sun Catcher
- Experiment with different color combinations for a unique look.
- Consider adding glitter to the glue mixture for extra sparkle.
- Make a variety of sizes and shapes for a more dynamic display.
- If you want to easily remove the sun catchers from molds, use a non-stick spray before pouring in the glue.
variation
You can use different shapes beyond butterflies, such as flowers, stars, or hearts. Simply find molds that suit your theme. Additionally, you can create layered sun catchers by letting one color dry before adding another on top.
FAQs
1. How long does it take for the sun catchers to dry?
Drying time can vary, but typically it takes about 24 hours for the glue to dry completely.
2. Can I use other types of glue?
Clear glue works best for this project. Other types, like school glue, might not produce the same clear effect.
3. How do I clean the sun catchers?
Simply wipe them gently with a damp cloth to remove dust. Avoid using strong cleaners as they may damage the colors.

Butterfly Crystal Sun Catcher
Ingredients
Method
- Start by laying down the plastic wrap on a flat surface. This will make it easy to remove your sun catchers once they are dry.
- In a bowl, pour clear glue and add a few drops of liquid food coloring, mixing well until you reach your desired color.
- Carefully pour the colored glue into the butterfly molds, filling each mold evenly.
- Allow the glue to dry completely, which usually takes about 24 hours.
- Once dry, gently peel the sun catchers off the molds and remove any excess plastic wrap.
- Your Butterfly Crystal Sun Catcher is ready to hang! Use string or a suction cup hook to display it in a sunny window.