
why make this recipe
Creating a DIY decorative mini fountain is a fun and rewarding project. Not only does it help you recycle plastic and craft materials, but it also adds a charming touch to your home or garden. This fake water effect fountain will be eye-catching and soothing, providing a perfect atmosphere for relaxation without needing real water. Plus, it’s a great way to express your creativity.
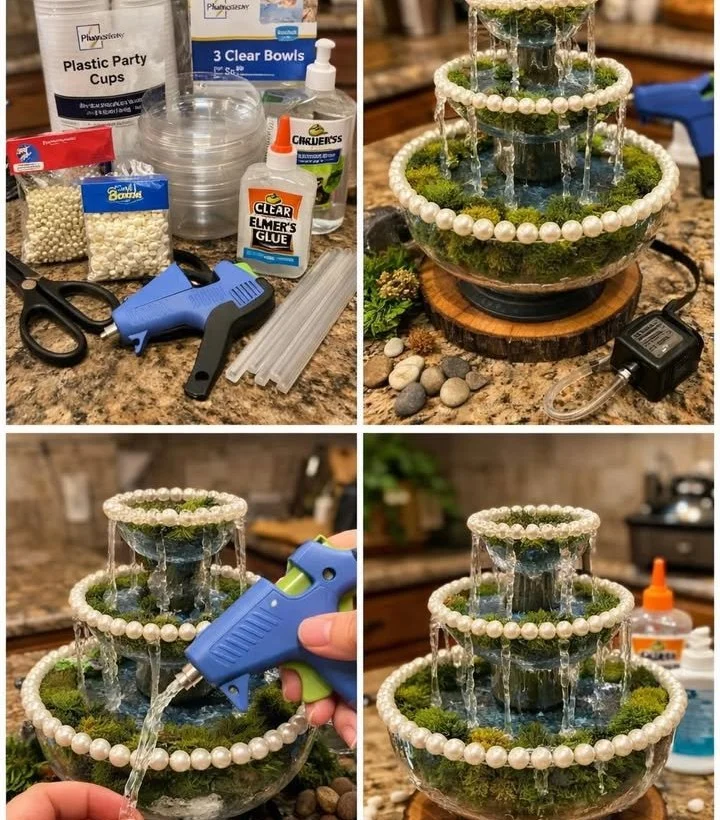
how to make DIY decorative mini fountain (fake water effect)
Ingredients :
- 1 large plastic bottle (e.g., a soda or juice bottle)
- Small plastic containers or cups (for the fountain base)
- Craft paints (blue, green, and white)
- Clear plastic wrap
- Small rocks or pebbles
- Craft glue or a hot glue gun
- Scissors
- A small piece of cardboard
- Optional: LED lights for a glowing effect
Directions :
-
Prepare the Bottle: Clean your plastic bottle thoroughly and remove any labels. Cut the bottle to the desired height for your fountain. A good height is around 6 to 12 inches.
-
Create the Base: Take the small plastic containers or cups and glue them together to form a sturdy base for your fountain. Ensure it is stable enough to hold the fountain structure.
-
Paint the Fountain: Use craft paints to decorate your bottle and base. Paint the bottle blue and the base green to resemble water and grass. You can add white paint splashes for a frothy water effect.
-
Add Fake Water: Cut a piece of clear plastic wrap to fit the top of the bottle. This will create the illusion of running water. Place it on top of the bottle, and secure it with craft glue.
-
Decorate with Rocks: Glue small rocks or pebbles around the base and on top of the bottle. This adds a natural look to your mini fountain. If you want to add LEDs, place them under the rocks for a glowing effect.
-
Finalize Your Fountain: Allow all parts to dry completely. Once dry, your decorative mini fountain is complete!
how to serve DIY decorative mini fountain
Place your DIY mini fountain in a cozy corner of your living room, on a shelf, or in the garden. It can serve as a lovely centerpiece for a table, or just a quaint addition to any space needing a bit of charm. If you’ve added LED lights, switch them on to enhance the ambiance during evenings.
how to store DIY decorative mini fountain
If you need to store your mini fountain, find a cool, dry place away from direct sunlight. You can wrap it in bubble wrap or a soft cloth to protect it from dust and damage. Avoid stacking heavy items on top of it.
tips to make DIY decorative mini fountain
- Choose bottles of different shapes and sizes for more variety.
- Experiment with different colors and designs for your rocks and base.
- Use non-toxic paints and glues to ensure safety, especially if placing the fountain near pets or children.
- Add small artificial plants or flowers around your fountain for an added touch.
variation
You can use other materials for a unique look. Instead of plastic, try using a ceramic or metal container. Additionally, consider adding small figurines or fairy lights around your fountain for a whimsical appearance.
FAQs
1. Can I use real water in this fountain?
No, this fountain is designed to simulate water using plastic wrap and paint. Real water could cause damage or mold over time.
2. How long will it take to make this fountain?
The crafting time can vary but generally takes about 2-3 hours, including drying time for the glue and paint.
3. Can I customize the size of the fountain?
Absolutely! You can adjust the height and width of the bottle and base to fit your preferences. Just ensure the base remains stable to support the fountain structure.
DIY Decorative Mini Fountain
Ingredients
Method
- Clean your plastic bottle thoroughly and remove any labels.
- Cut the bottle to the desired height for your fountain (around 6 to 12 inches).
- Take the small plastic containers or cups and glue them together to form a sturdy base.
- Ensure the base is stable enough to hold the fountain structure.
- Use craft paints to decorate your bottle and base.
- Paint the bottle blue and the base green to resemble water and grass.
- Add white paint splashes for a frothy water effect.
- Cut a piece of clear plastic wrap to fit the top of the bottle for a simulated running water effect.
- Place it on top of the bottle and secure it with craft glue.
- Glue small rocks or pebbles around the base and on top of the bottle for a natural look.
- If using LEDs, place them under the rocks for a glowing effect.
- Allow all parts to dry completely. Once dry, your decorative mini fountain is complete!