
why make this recipe
Creating a DIY Fairy Butterfly Sun Catcher is a fun and easy project. It brings a touch of whimsy and magic to your home. By making this sun catcher, you can enjoy the beauty of colorful butterflies that dance in the sunlight. This craft is great for all ages and can be a wonderful activity to do with family and friends.
how to make DIY Fairy Butterfly Sun Catcher
Ingredients:
- Clear plastic sheets or transparency film
- Permanent markers in various colors
- Scissors
- String or fishing line
- Hole punch
- A butterfly template (you can print one or draw your own)
- A sunny window
Directions:
-
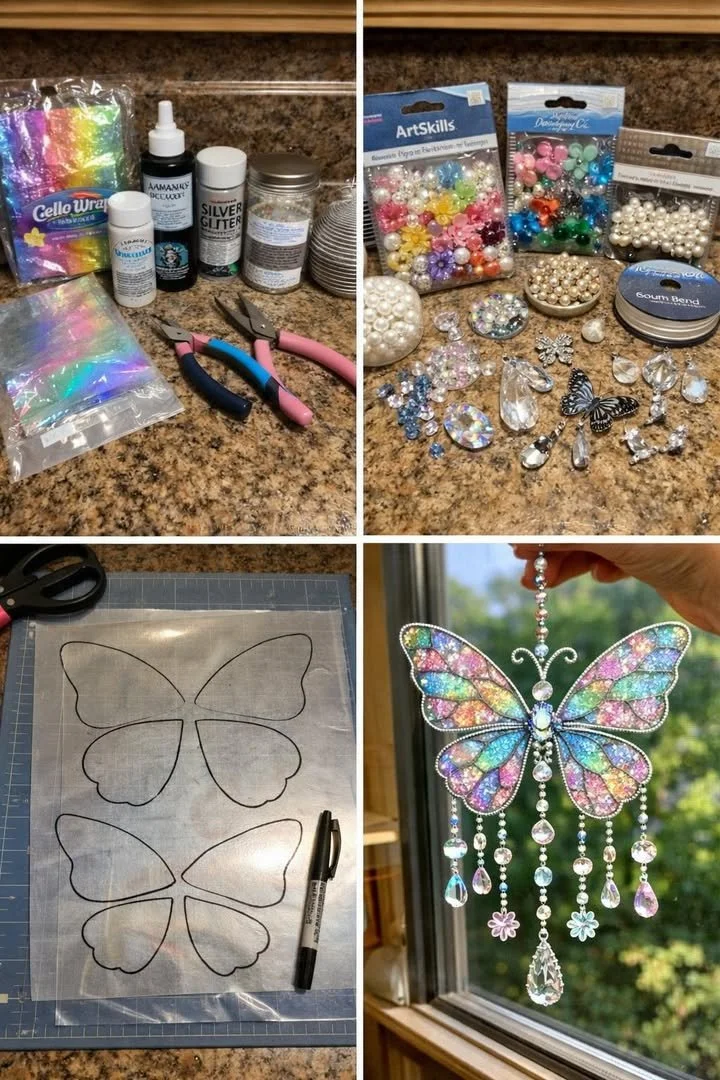
Prepare the Template: Start by choosing a butterfly template. You can find one online or draw your own. If you’re using a printed template, cut it out.
-
Trace the Butterfly: Place the butterfly template under a clear plastic sheet. With a permanent marker, trace the shape of the butterfly on the plastic.
-
Color the Butterfly: Fill in the butterfly shape with vibrant colors. Mix and match colors to create different patterns and designs.
-
Cut Out the Butterfly: Once the ink is dry, carefully cut out the butterfly from the plastic sheet.
-
Punch a Hole: Use the hole punch to make a small hole at the top of your butterfly. This is where you will attach the string.
-
Attach the String: Cut a piece of string or fishing line. Thread it through the hole and tie a knot to secure it.
-
Hang It Up: Find a sunny window and hang your butterfly sun catcher. Enjoy how it sparkles in the light!
how to serve DIY Fairy Butterfly Sun Catcher
This sun catcher is a decorative piece meant to hang in a window. Display it alongside other sun catchers or colorful decorations to create a magical ambiance in any room. It makes your space feel cheerful and bright!
how to store DIY Fairy Butterfly Sun Catcher
To keep your DIY Fairy Butterfly Sun Catcher in good condition, simply take it down and store it flat in a dry, cool place. Avoid stacking heavy items on top of it to prevent any bending or damage.
tips to make DIY Fairy Butterfly Sun Catcher
- Use vibrant colors for a more eye-catching design.
- Try using glitter or metallic markers to add extra sparkle.
- Mix different shapes and sizes of butterflies for a unique display.
- Experiment with transparency film or different types of plastic for varied effects.
variation
You can create flower or fairy shapes instead of just butterflies. Try making a collection of different designs to hang together for added charm.
FAQs
Q: Can I use regular paper instead of plastic sheets?
A: Regular paper will not work well for this project since it cannot withstand sunlight. Use clear plastic sheets or transparency film for best results.
Q: Will the colors fade over time?
A: Yes, permanent markers may fade when exposed to direct sunlight for long periods. To prolong the life of your sun catcher, keep it in a spot with indirect sunlight when possible.
Q: Can children help with this project?
A: Absolutely! This is a great craft for kids. Just make sure to supervise them with scissors and markers.

DIY Fairy Butterfly Sun Catcher
Ingredients
Method
- Choose a butterfly template. Cut it out if it's printed.
- Place the template under a clear plastic sheet.
- Trace the shape of the butterfly with a permanent marker.
- Fill in the butterfly shape with vibrant colors.
- Once the ink is dry, carefully cut out the butterfly from the plastic sheet.
- Use the hole punch to create a hole at the top of your butterfly.
- Thread a piece of string or fishing line through the hole and tie a knot.
- Hang your butterfly sun catcher in a sunny window and enjoy the sparkles in the light.