
Why Make This Recipe
Creating the Colorful Owl Tree Wall Craft is a fun and engaging way to bring life to any wall in your home. This craft is not only a delightful activity for kids, but it also encourages creativity and fine motor skills. Plus, the colorful owls will add a charming touch to your space. Whether it’s for a playroom, classroom, or just a fun weekend project, this craft is a wonderful way to spend time with family or friends.
How to Make Colorful Owl Tree Wall Craft
Ingredients:
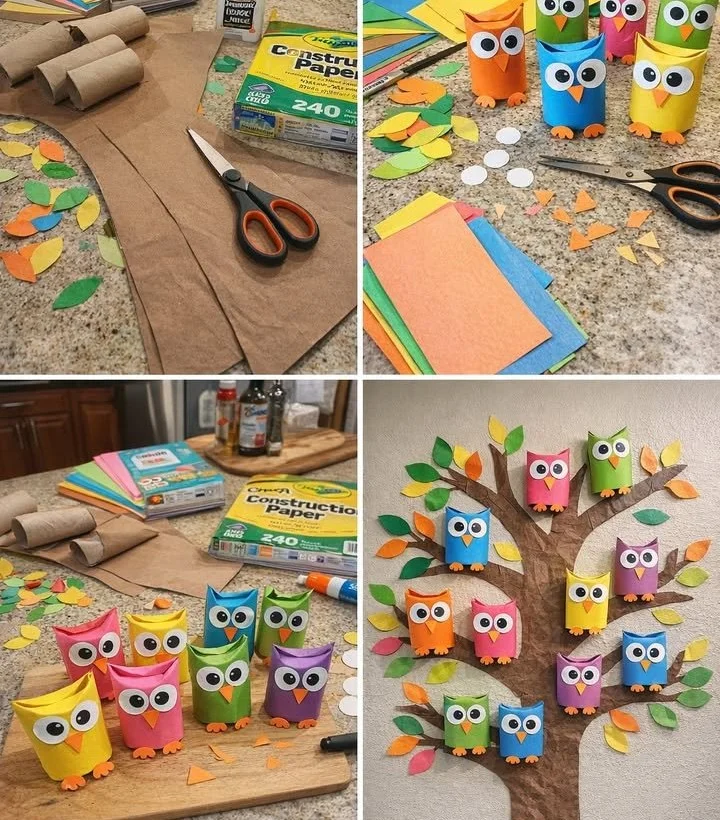
- Empty toilet paper rolls
- Colored paper (green, blue, pink, yellow, orange)
- Brown paper (for the tree)
- White, black, and pink paper (for eyes and beak)
- Glue or glue stick
- Scissors
- Black marker
- Cardboard or wall surface for mounting
Directions:
- Create the Tree Base: Cut a large tree trunk and branches from brown paper. Glue or tape it onto a wall or cardboard background.
- Add Leaves: Cut leaf shapes in different colors (green, yellow, orange). Glue them around the branches for a lively look.
- Prepare the Owls: Take paper rolls and press the top edges inward to form owl ‘ears’.
- Wrap the Rolls: Cover each roll with different colored paper to create a variety of owls.
- Make the Eyes: Cut large white circles and smaller black circles for pupils. Glue them onto the owls.
- Add the Beak & Feet: Cut small triangles for beaks and tiny shapes for feet. Glue them in place.
- Attach the Owls: Glue the finished owls onto the branches of the tree.
- Final Touches: Adjust spacing, add more leaves if needed, and let everything dry.
How to Serve Colorful Owl Tree Wall Craft
Once your craft is complete, hang it on a wall as a vibrant decoration. It can serve as a focal point in a room, giving it a cheerful and inviting atmosphere. Consider incorporating it in a themed party or as part of a classroom display.
How to Store Colorful Owl Tree Wall Craft
To store your Colorful Owl Tree Wall Craft, carefully detach the owls from the branch if possible. Place them in a flat box or an airtight container to keep them safe from dust and damage. Ensure everything is dry before storing to avoid any sticking or mess.
Tips to Make Colorful Owl Tree Wall Craft
- Encourage children to pick their favorite colors for their owls.
- Use recycled materials for a more eco-friendly craft.
- Personalize the owls by adding names or funny faces with the black marker.
- Allow ample time for everything to dry, especially after gluing.
Variation
You can modify this craft by using different animals or even making a seasonal theme. For example, during Halloween, you could create a spooky tree with bats and ghost owls.
FAQs
Q: Can I use different materials instead of colored paper?
A: Yes! You can use fabric scraps, magazine clippings, or even paint the toilet paper rolls.
Q: How long does this craft take to finish?
A: This craft usually takes about 1-2 hours, depending on how intricately you decorate your owls and tree.
Q: Is this craft suitable for very young children?
A: Yes, with adult supervision for cutting and gluing, this craft can be a fun experience for young kids to explore their creativity!
Colorful Owl Tree Wall Craft
Ingredients
Method
- Cut a large tree trunk and branches from brown paper.
- Glue or tape it onto a wall or cardboard background.
- Cut leaf shapes in different colors (green, yellow, orange).
- Glue them around the branches for a lively look.
- Take paper rolls and press the top edges inward to form owl 'ears'.
- Cover each roll with different colored paper to create a variety of owls.
- Cut large white circles and smaller black circles for pupils.
- Glue them onto the owls.
- Cut small triangles for beaks and tiny shapes for feet.
- Glue them in place.
- Glue the finished owls onto the branches of the tree.
- Adjust spacing, add more leaves if needed, and let everything dry.