
why make this recipe
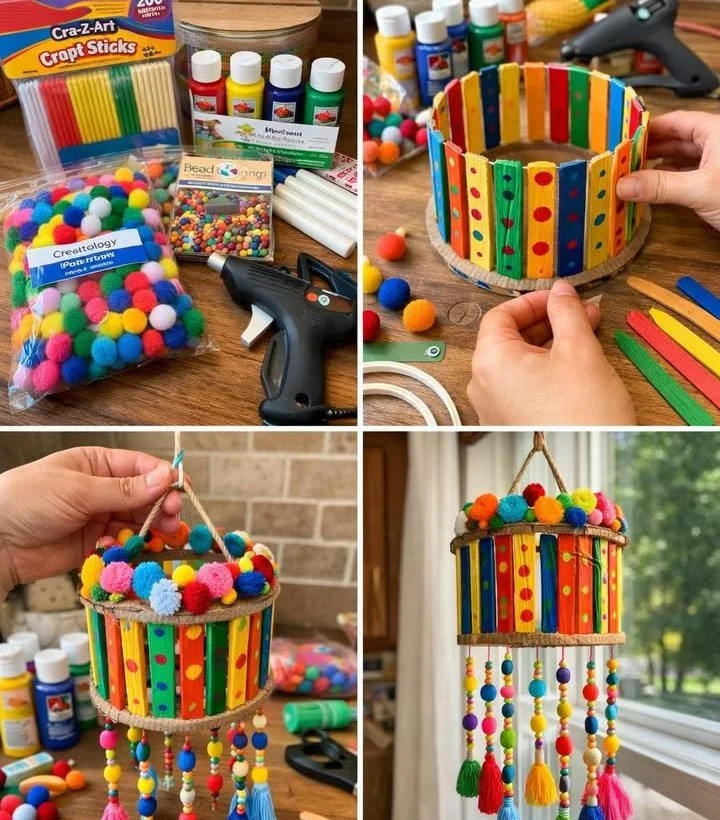
Making a DIY lantern rattle (colgante de linterna/sonajero) is fun and easy. It allows you to add a touch of color and creativity to your space. This project is also a fantastic way to engage kids in craft activities. They can learn about colors and textures while making something enjoyable. Plus, you get to decorate with a unique piece made by your own hands!
how to make DIY colgante de linterna/sonajero
Ingredients :
- Colorful sticks (you can use craft sticks, wooden dowels, or popsicle sticks)
- Yarn or string (for hanging)
- Colorful tassels (pom-poms can also work)
- Scissors
- Glue
- Optional: Decorative items like beads or stickers
Directions :
- Gather all your materials on a clean workspace.
- Take a few colorful sticks and arrange them in the shape of a lantern. You can make a square or a rectangular base.
- Use glue to stick the sticks together at the corners to form your shape. Let it dry completely.
- Once dry, take your yarn or string and cut it to the desired length for hanging.
- Tie one end of the string to the top of your lantern shape.
- Attach tassels or pom-poms to the bottom of the lantern. You can use glue or tie them to the sticks directly.
- If you like, decorate your lantern with beads or stickers for extra flair.
- Allow everything to dry, and then it’s ready to hang!
how to serve DIY colgante de linterna/sonajero
You can hang your DIY lantern rattle in various places. Consider using it in a child’s room, a playroom, or even outdoors during a garden party. It adds a fun and colorful atmosphere wherever you decide to use it.
how to store DIY colgante de linterna/sonajero
If you need to store your lantern, make sure it’s in a dry place away from direct sunlight. You can place it in a box or hang it in a closet. Just be careful not to crush any tassels or decorations.
tips to make DIY colgante de linterna/sonajero
- Use a variety of stick lengths for a more dynamic look.
- Encourage kids to choose their favorite colors to make it more personalized.
- If using outdoors, consider using waterproof glue or materials to ensure it lasts longer.
variation
You can switch up the design by creating different shapes, like stars or hearts. Additionally, try using ribbon instead of yarn for the hanging string for another texture.
FAQs
Q: Can I use other materials besides sticks?
A: Yes! You can use cardboard, plastic straws, or even bottle caps for your lantern.
Q: How long will it take to make this project?
A: Generally, it takes about 30 to 60 minutes to complete, depending on decoration and drying time.
Q: Is this project suitable for all ages?
A: Yes, but younger children may need help with cutting and gluing. It’s perfect for supervised crafting sessions!
DIY Lantern Rattle
Ingredients
Method
- Gather all your materials on a clean workspace.
- Take a few colorful sticks and arrange them in the shape of a lantern, square or rectangular.
- Use glue to stick the sticks together at the corners. Let it dry completely.
- Cut the yarn or string to the desired length for hanging.
- Tie one end of the string to the top of your lantern shape.
- Attach tassels or pom-poms to the bottom of the lantern using glue or by tying them directly to the sticks.
- If desired, decorate your lantern with beads or stickers for extra flair.
- Allow everything to dry, then it's ready to hang!