
why make this recipe
Making a DIY Spiral Flower Wind Chime is a fun and creative way to bring a touch of nature to your home. These beautiful chimes not only look lovely hanging in your garden or on your porch, but they also create soft sounds when the wind blows. It’s a great project for all ages and can be customized to fit your style with different colors and decorations.
how to make DIY Spiral Flower Wind Chime
Ingredients :
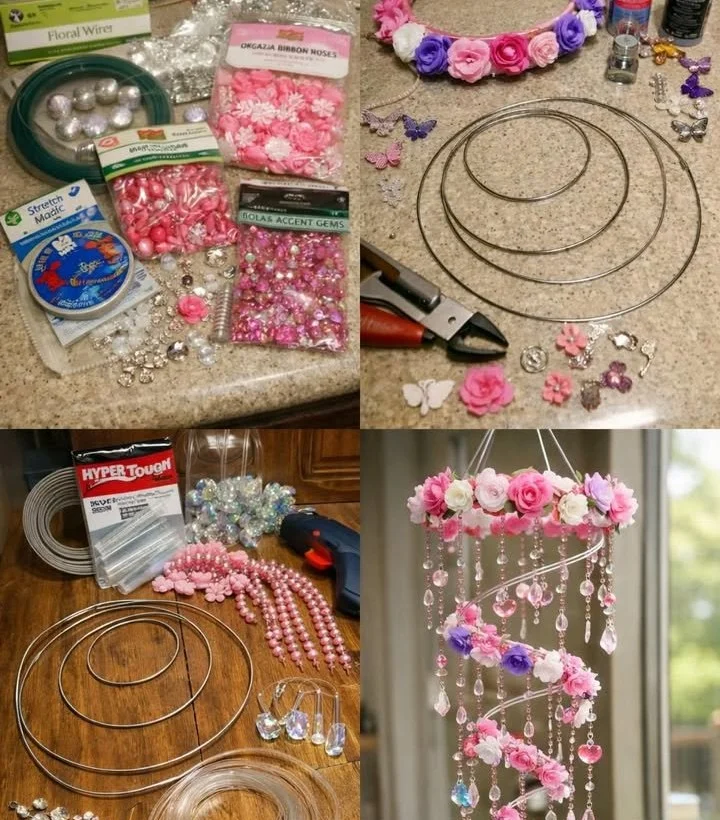
- Plastic flower pieces or ribbon flowers
- Circular wire rings
- Beads and crystal charms
- Hanging strings
- Thick floral wire or embroidery hoops
- Nylon thread or fishing line
- Pink beads and crystal charms
- Hot glue gun
- Wire cutters
- Needle or awl
- Hanging ring or hoop
- Optional: Fairy lights, Pearls, Butterfly charms, Glitter spray, Bells
Directions :
- Create the Top Crown Ring by bending thick wire into a circle, wrapping it with ribbon or decorative tape. Glue folded flower pieces around the top edge for fullness.
- Make the Spiral Frame by bending floral wire into a spiral shape or connecting several rings diagonally to form the structure.
- Prepare the Flowers using ribbon, plastic, or folded petals. Use alternate colors for a gradient effect to add visual interest.
- Attach Flowers to the Spiral by gluing or tying them closely along the frame, ensuring they are secure and evenly spaced.
- Add Hanging Crystal Strands by cutting fishing line and threading on beads, stars, crystal drops, and bells. Hang them evenly from the spiral.
- Add Bottom Charms like crystal balls, bells, and heart charms for extra charm and sound.
- Attach Hanging Strings to the top and tie them into one loop, making it easy to hang.
- Optionally, wrap mini fairy lights around the spiral for a glowing effect at night, enhancing the beauty of your wind chime.
how to serve DIY Spiral Flower Wind Chime
You can serve your DIY Spiral Flower Wind Chime by hanging it in a place where it can catch the wind, such as under an awning, in a tree, or from a porch ceiling. Position it somewhere you can enjoy both the sights and sounds it creates.
how to store DIY Spiral Flower Wind Chime
To store your wind chime, carefully take it down and hang it indoors in a dry area. Avoid exposing it to extreme weather conditions to keep it looking fresh. If it has fairy lights, remove the batteries to save them for the next use.
tips to make DIY Spiral Flower Wind Chime
- Use a variety of flower colors and shapes to create a more dynamic look.
- Make sure the beads and charms you choose are lightweight to prevent the wind chime from becoming too heavy.
- Secure all glued pieces well, especially if you live in windy areas.
- Experiment with different lengths for the hanging strings to add depth to your design.
- Consider adding other elements like pearls or butterfly charms for added charm.
variation
You can customize your wind chime by changing the theme or colors according to the seasons—like using autumn leaves for fall or vibrant flowers for summer. You can also incorporate different types of bells or natural elements like seashells for a beachy vibe.
FAQs
1. How long does it take to make a Spiral Flower Wind Chime?
It usually takes about 2-3 hours to complete, depending on your design and decoration choices.
2. Can I use real flowers instead of plastic or ribbon?
While real flowers can give a beautiful look, they may not last as long in outdoor conditions. Consider using dried flowers if you want a natural look.
3. How can I clean my wind chime?
To clean your wind chime, gently wipe it down with a soft cloth. Avoid using harsh chemicals to prevent damaging the materials.
Spiral Flower Wind Chime
Ingredients
Method
- Create the Top Crown Ring by bending thick wire into a circle, wrapping it with ribbon or decorative tape.
- Glue folded flower pieces around the top edge for fullness.
- Bend floral wire into a spiral shape or connect several rings diagonally to form the structure.
- Use ribbon, plastic, or folded petals in alternate colors for a gradient effect.
- Glue or tie flowers closely along the frame, ensuring they are secure and evenly spaced.
- Cut fishing line and thread on beads, stars, crystals, and bells. Hang them evenly from the spiral.
- Add bottom charms like crystal balls, bells, and heart charms.
- Attach hanging strings to the top and tie them into one loop, making it easy to hang.
- Optionally, wrap mini fairy lights around the spiral for a glowing effect.