

why make this recipe
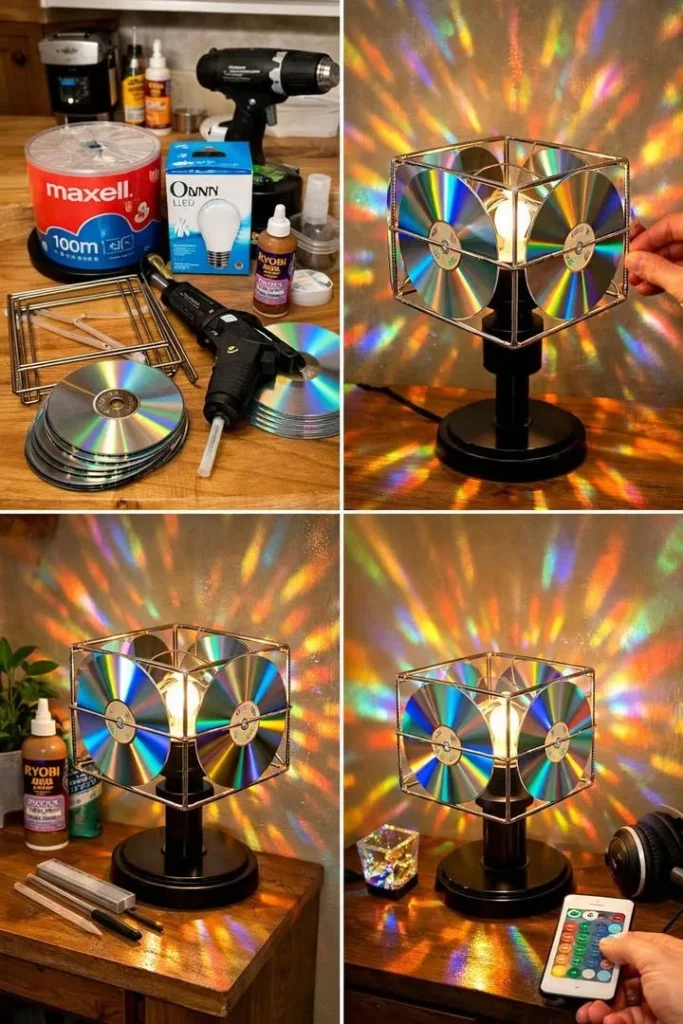
Making a DIY CD/DVD rainbow lamp is a fun and creative way to upcycle old discs. Instead of throwing them away, you can transform them into a beautiful lamp that spreads colorful light around your room. This project not only adds a touch of magic to your space but also helps the environment by reducing waste. Whether you’re looking to brighten your home or want a unique piece of decor, this rainbow lamp is an excellent choice.
how to make an amazing DIY CD/DVD rainbow lamp
Ingredients:
- Old CDs or DVDs
- A small lamp base (you can use an old lamp)
- A light bulb (LED lights work best)
- Super glue or hot glue gun
- Scissors (optional)
- Wire or string (if needed for hanging)
- A round base or plate to hold the lamp (if not using an old lamp)
Directions:
-
Prepare Your Workspace: Clear a flat surface for your crafting. Lay down newspaper for easy cleanup.
-
Gather Materials: Collect all your ingredients and tools. If you’re using an old lamp, remove the shade.
-
Cut the CDs: Using scissors, carefully cut the CDs into small pieces or shapes. You can create triangles, squares, or even leave them whole for a different look.
-
Attach the Pieces: Use the super glue or hot glue gun to attach the CD pieces to the lamp base. Start from the bottom and work your way up, overlapping the pieces slightly to create a nice pattern.
-
Add the Light: Place the light bulb in the lamp. Ensure it’s properly fixed in place.
-
Test the Lamp: Once the glue is dry, plug in the lamp and switch it on. Enjoy the colorful beams reflecting around the room!
-
Display Your Lamp: Find a nice spot in your home to show off your new rainbow lamp.
how to serve this amazing DIY CD/DVD rainbow lamp
To make the most of your DIY CD/DVD rainbow lamp, place it in a dimly lit room. This way, the light beams can reflect beautifully, creating enchanting patterns on the walls and ceiling. It’s perfect for a cozy evening atmosphere or as a unique nightlight.
how to store this amazing DIY CD/DVD rainbow lamp
If you need to store your rainbow lamp, keep it in a cool, dry place. Make sure to unplug it before storing. If you have detachable parts, like a lamp shade, store them separately to avoid damage.
tips to make this amazing DIY CD/DVD rainbow lamp
- Be Creative: Don’t be afraid to experiment with different shapes and colors of CDs.
- Consider Safety: Use LED lights to avoid overheating and to ensure safety.
- Secure Connections: Make sure all pieces are glued down well to prevent them from falling off in the future.
variation
You can personalize your lamp by painting the base or adding stickers. You can also use colored plastic or glass to create a different look. If you want a portable version, consider making a smaller version that can hang from a hook or a stand.
FAQs
Can I use any type of lights for this lamp?
While you can use any light bulb, LED lights are the best choice because they stay cool and are energy efficient.
What if I don’t have a lamp base?
You can create your own base with a round plate or a small box. Just make sure it’s stable and can hold the light bulb.
How long will the lamp last?
The lifespan of your lamp will depend on how well it’s made and the type of light bulb you use. With proper care, it can last for years!
DIY CD/DVD Rainbow Lamp
Ingredients
Method
- Clear a flat surface for your crafting. Lay down newspaper for easy cleanup.
- Gather all your ingredients and tools. If you’re using an old lamp, remove the shade.
- Using scissors, carefully cut the CDs into small pieces or shapes, such as triangles or squares.
- Use super glue or a hot glue gun to attach the CD pieces to the lamp base, starting from the bottom and overlapping them slightly.
- Place the light bulb in the lamp base, ensuring it is fixed in place.
- Once the glue is dry, plug in the lamp and switch it on to enjoy the colorful beams.
- Find a nice spot in your home to display your rainbow lamp.