
Every holiday season has that one recipe —
the one that’s so easy, so adorable,
and so universally loved that it becomes
a non-negotiable tradition year after year.
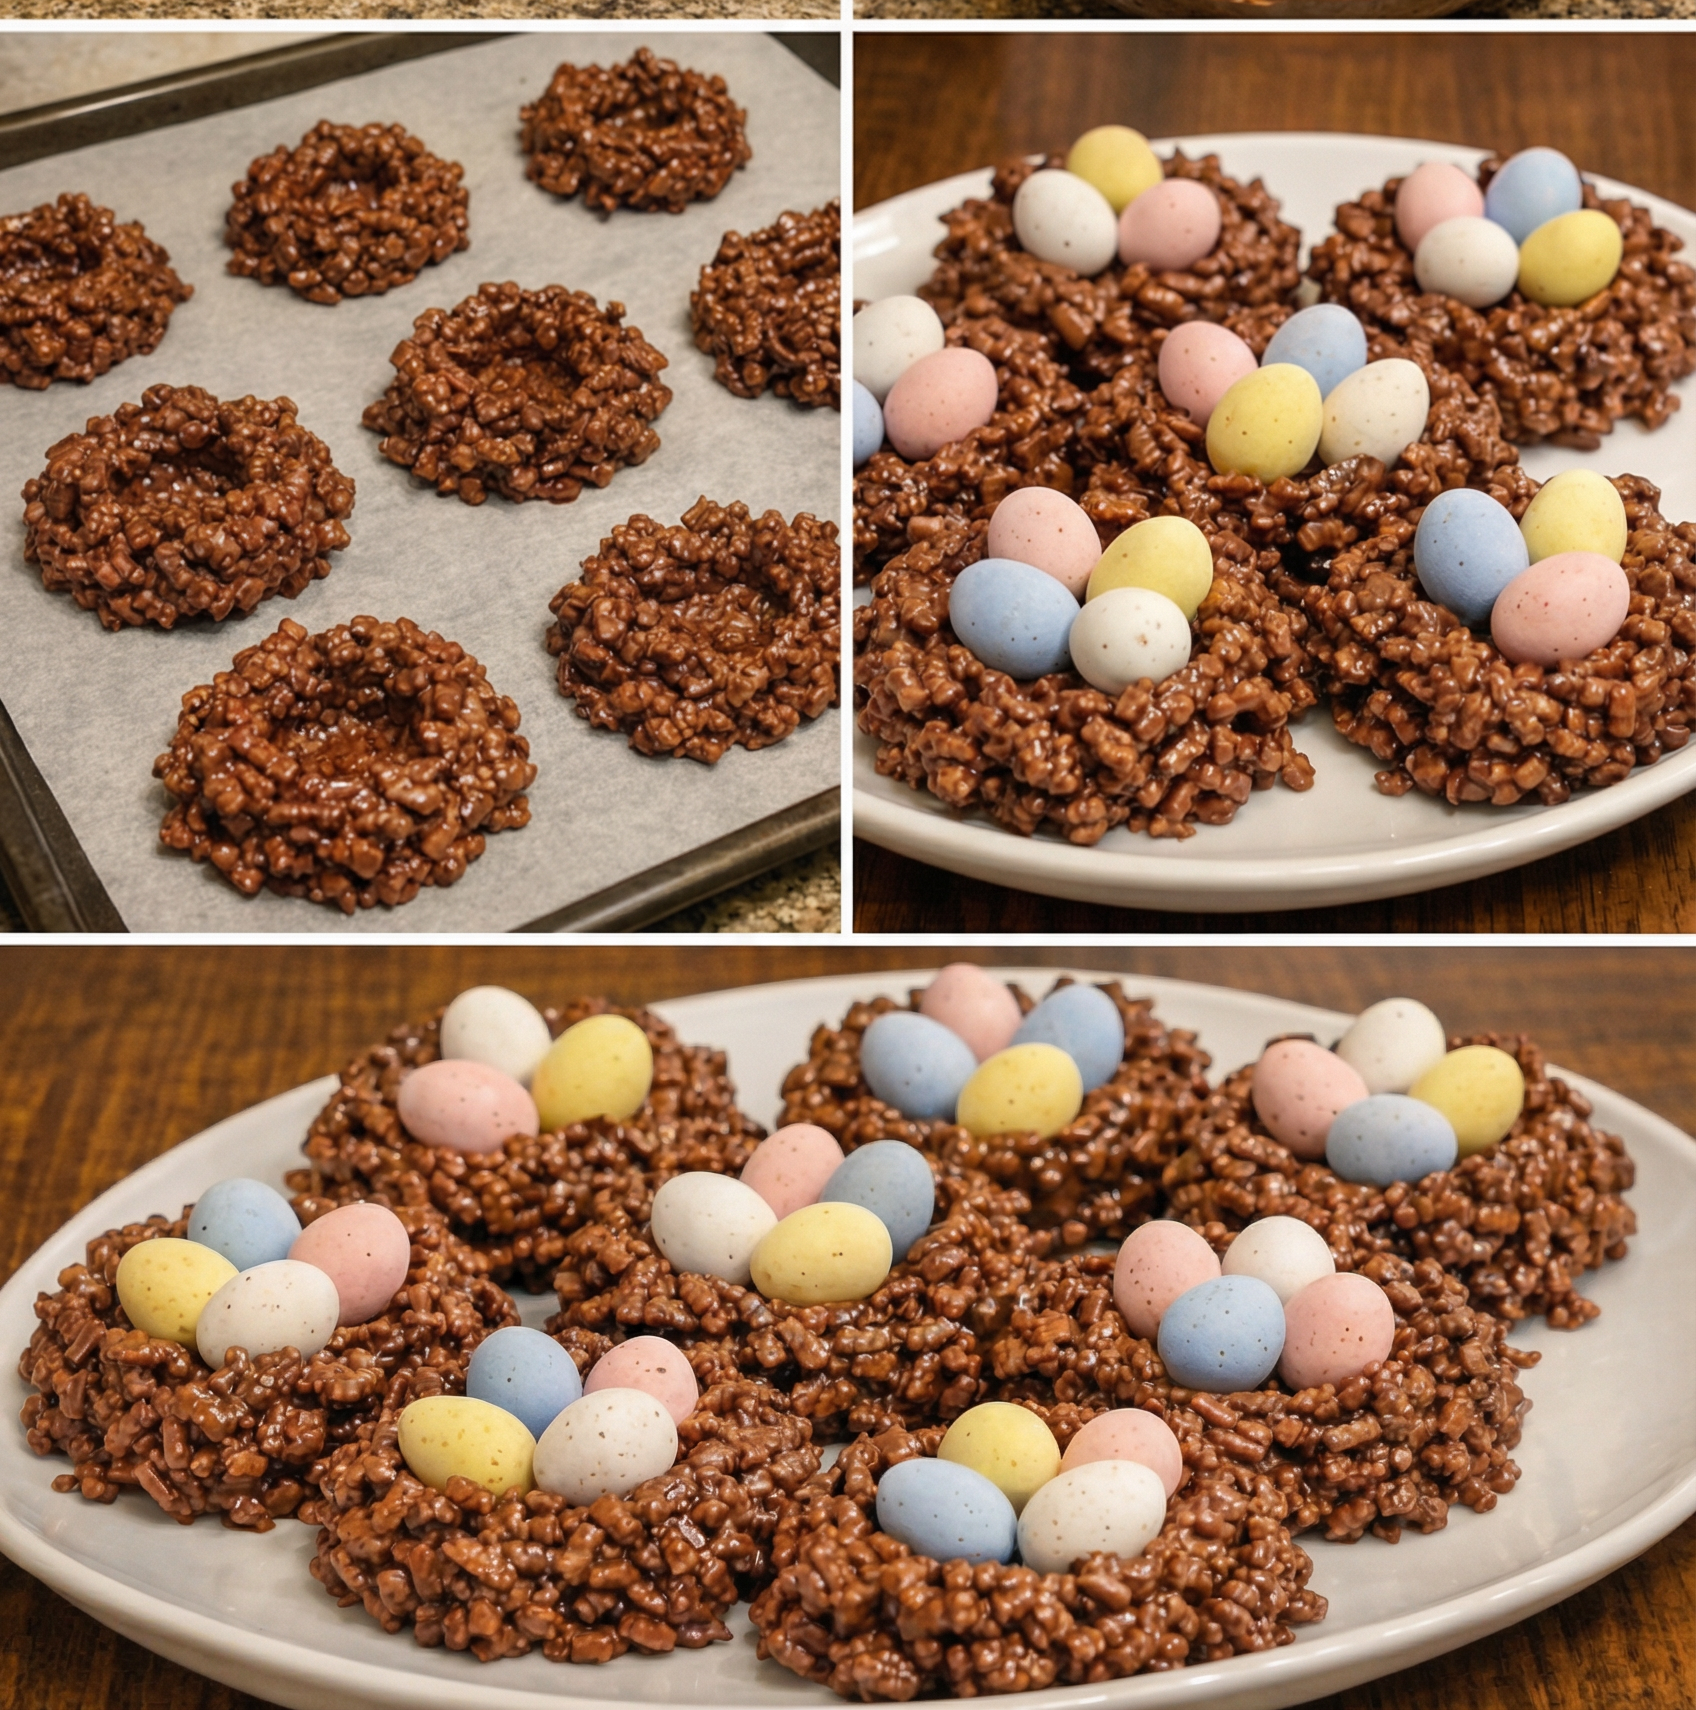
For Easter, that recipe is these
Chocolate Bird Nest Treats. Made with just four ingredients,
requiring absolutely no baking,
and coming together in under 30 minutes,
these crunchy chocolate and peanut butter nests
topped with pastel mini eggs are everything
you want in a holiday treat:
beautiful, delicious, and effortlessly simple. Whether you’re making them with kids
on a rainy spring afternoon,
bringing them to an Easter gathering,
or setting them out as part of a holiday dessert table —
these little nests never fail to make people smile. What Are Chocolate Bird Nest Treats? Chocolate Bird Nest Treats are no-bake confections
made by coating cocoa cereal in a melted mixture
of chocolate chips and creamy peanut butter,
then shaping individual portions into small nests
with a slight indentation in the center. While the mixture is still soft and pliable,
pastel-colored mini chocolate eggs are nestled
into the center of each one —
completing the bird nest illusion
in the most charming, edible way possible. Once set, they’re crunchy, rich, chocolatey,
and have that irresistible peanut butter depth
that makes them impossible to eat just one of. Why This Recipe Works Every Time No baking required — ever
This is a completely no-bake recipe
from start to finish.
No oven, no candy thermometer,
no special equipment beyond a microwave
and a mixing bowl.
It’s genuinely one of the most accessible
confectionery recipes that exists. It’s ready in under 30 minutes
Active prep time is about 15 minutes.
Refrigerate for 20–30 minutes to set,
and you have a finished,
plate-ready Easter treat
faster than almost any other holiday recipe. Kids can make these almost entirely themselves
The steps are simple, safe,
and tactilely satisfying for children —
stirring the cereal, scooping the mixture,
pressing the indentation,
and placing the eggs are all
enormously enjoyable tasks for young helpers.
This is one of the best holiday baking
projects for families with children. They look incredibly impressive for the effort
There’s a significant mismatch between
how simple these are to make
and how beautiful they look on a platter.
The nest shape, the glossy chocolate coating,
the colorful pastel eggs in the center —
together they create a presentation
that looks genuinely artisanal. They travel and store beautifully
Once set, these nests are firm,
stable, and completely portable —
perfect for bringing to Easter brunches,
school parties, church gatherings,
or springtime potlucks.
Complete Ingredients Guide
4 cups Cocoa Rice Krispies cereal
The structural backbone of the nest.
Cocoa Rice Krispies provide three things simultaneously:
the crunchy texture that makes each bite satisfying,
the cocoa flavor that deepens the overall
chocolate intensity of the treat,
and the visual appearance of twigs and nest material
that makes the bird nest illusion so convincing.
Regular Rice Krispies work as a substitute
if Cocoa Rice Krispies aren’t available,
though the double chocolate effect
is part of what makes this recipe so good.
1 cup milk chocolate chips
The binding agent and primary chocolate flavor.
Milk chocolate creates a sweeter,
creamier result than dark chocolate —
ideal for a crowd-pleasing treat
that appeals to both children and adults.
Semi-sweet chocolate chips can be substituted
for a slightly less sweet,
more intense chocolate flavor.
Quality matters here —
name-brand chocolate chips
(Ghirardelli, Guittard, or Nestlé Toll House)
melt more smoothly and set more firmly
than generic alternatives.
½ cup creamy peanut butter
The ingredient that elevates these nests
from simple chocolate cereal treats
to something genuinely special.
Peanut butter adds richness, depth,
a subtle saltiness, and a creaminess
to the chocolate mixture that makes it
more complex and satisfying.
Use regular commercial creamy peanut butter
(like Jif or Skippy) rather than
natural peanut butter for this recipe.
Natural peanut butter contains more oil
and less emulsifiers,
which can cause the mixture
to separate or set unevenly.
1 cup Cadbury Mini Eggs
(or similar pastel chocolate eggs)
The finishing touch that transforms
chocolate cereal mounds into Easter nests.
Cadbury Mini Eggs — with their
crisp sugar shell and rich chocolate center —
are the classic choice,
but any pastel-colored candy-coated
chocolate eggs work beautifully.
The variety of pastel colors
(pink, yellow, blue, purple)
creates visual interest across the platter
and reinforces the springtime Easter aesthetic.
Step-by-Step Instructions
Step 1: Prepare Your Workspace
Line a large baking sheet with parchment paper.
Set aside. Having this ready before you start
is important because once the chocolate mixture
is added to the cereal, you need to work
relatively quickly before it begins to set.
Step 2: Melt the Chocolate and Peanut Butter
Combine the chocolate chips and peanut butter
in a microwave-safe glass bowl.
Microwave on medium power in 30-second intervals,
stirring thoroughly after each interval.
After the first 30 seconds, the mixture
may not look fully melted — stir anyway.
Continue microwaving in 30-second bursts,
stirring between each, until the mixture
is completely smooth and glossy
with no remaining solid pieces.
This typically takes 2–3 intervals total —
approximately 60–90 seconds of actual microwave time.
Critical technique note:
Do not microwave in one long burst.
Chocolate scorches easily and seized,
grainy chocolate cannot be rescued.
Short intervals with stirring between
is the only correct method.
Step 3: Coat the Cereal
Measure the Cocoa Rice Krispies
into a large mixing bowl.
Pour the warm chocolate-peanut butter mixture
over the cereal.
Using a large rubber spatula,
fold and stir gently —
not vigorously — until every piece of cereal
is evenly coated with the chocolate mixture.
Work from the bottom of the bowl upward,
turning the cereal over repeatedly
rather than stirring in circles.
The goal is complete, even coating
without crushing the cereal.
Gentle folding preserves the crunch
that makes these nests satisfying.
Step 4: Scoop and Shape
Working quickly before the mixture cools
and becomes difficult to shape,
scoop approximately 2 tablespoons of the mixture
onto the prepared parchment-lined baking sheet.
A cookie scoop or ice cream scoop
makes this step faster and more uniform.
Immediately after placing each mound,
use the back of a spoon
or lightly greased fingertips
to press a gentle indentation into the center —
creating the nest shape.
The indentation should be deep enough
to cradle 2–3 mini eggs
without them rolling off.
Work through all the mixture before
going back to add eggs —
shaping while the chocolate is still
warm and pliable is much easier
than trying to reshape cooled nests.
Step 5: Add the Mini Eggs
While the nests are still soft,
place 2–3 Cadbury Mini Eggs
into the center indentation of each nest.
Press them in very gently so they sit
slightly embedded rather than
just resting on the surface —
this ensures they stay in place
after the chocolate sets.
Vary the color combinations across different nests
for the most visually appealing platter.
Step 6: Set and Firm
Leave the nests to set at room temperature
for approximately 1 hour,
or refrigerate for 20–30 minutes
for a faster result.
The nests are ready when they’re
completely firm to the touch
and the chocolate coating has set solidly.
They should hold their shape completely
when lifted from the parchment.
Tips for Perfect Chocolate Bird Nests
Work quickly after mixing
The chocolate-peanut butter mixture
begins cooling and thickening as soon as
it’s added to the cereal.
Have your baking sheet ready and
work through the scooping and shaping
as efficiently as possible
for the best results.
Lightly grease your hands
If shaping with your fingers,
rub a small amount of vegetable oil
or cooking spray on your hands first.
This prevents the chocolate mixture
from sticking and makes shaping
much cleaner and easier.
Make indentations deeper than you think necessary
The nests firm up as they set
and the indentation becomes less pronounced.
Make it noticeably deeper than you want
the final result to be —
it will look perfect once set.
Use a cookie scoop for uniformity
A standard 2-tablespoon cookie scoop
produces perfectly uniform nests
that set evenly and look beautiful
on a platter. Hand scooping works,
but the size variation is noticeable.
Add eggs immediately after shaping
Don’t let the nests begin setting
before adding the eggs —
place them while the chocolate is still warm
and pliable so they embed slightly
rather than sitting loose on the surface.
Variations for Every Taste
White Chocolate Nests
Replace milk chocolate chips with white chocolate chips
for a sweeter, vanilla-forward flavor
and a beautiful pale base
that makes the colorful eggs pop visually.
Butterscotch Nests
Substitute butterscotch chips for the chocolate chips
for a warm, caramel-like flavor
that pairs surprisingly well
with the peanut butter.
Almond Butter Version
Replace peanut butter with almond butter
for a slightly more subtle,
nutty flavor that works beautifully
for those with peanut allergies
(ensure the chocolate chips are also peanut-free).
Pretzel Nest Addition
Replace 1 cup of Cocoa Rice Krispies
with 1 cup of roughly crushed mini pretzels
for a sweet-salty combination
and additional textural variety.
Chow Mein Noodle Nests
For a more traditional nest appearance,
substitute chow mein noodles for the cereal.
The long, thin noodles create
a remarkably realistic nest texture
and shape that’s visually stunning.
Dark Chocolate Peppermint Version
Use dark chocolate chips and add
1/4 teaspoon peppermint extract
to the melted mixture for a
cool, minty variation perfect for winter holidays.
Making These with Kids: A Complete Guide
These nests are one of the best recipes
to make with children,
and assigning age-appropriate tasks
makes the experience enjoyable for everyone:
Ages 3–5:
Pouring the cereal into the bowl,
placing the mini eggs into the finished nests,
and licking the spatula (the most important job).
Ages 6–9:
Stirring the cereal with the chocolate mixture,
scooping the mixture onto the baking sheet,
and choosing which color eggs go in each nest.
Ages 10 and up:
Melting the chocolate in the microwave
with adult supervision,
managing the full recipe mostly independently,
and decorating the finished platter.
The entire process — from gathering ingredients
to placing the last mini egg —
takes about 20 minutes of active time,
which is perfectly within
the attention span of most children.
Serving and Display Ideas
Individual cellophane bags:
Place each nest in a small cellophane bag
tied with a ribbon for individual Easter gifts,
party favors, or school treats.
They look incredibly charming packaged this way.
Easter basket addition:
Tuck a few nests into Easter baskets
alongside traditional candy —
the homemade element makes
the basket feel extra special.
Dessert table centerpiece:
Arrange a full batch on a large
wooden board or cake stand,
varying the egg color combinations
across the nests for a visually stunning display.
Springtime gift box:
Layer nests in a decorative box
with tissue paper for a
beautiful homemade Easter gift.
How to Store Chocolate Bird Nest Treats
Room temperature:
Store in a single layer
(or with parchment between layers)
in an airtight container at room temperature
for up to 5 days.
Keep away from warm areas —
the chocolate will soften in heat.
Refrigerator:
Refrigerate in an airtight container
for up to 2 weeks.
Allow to come to room temperature
for 10 minutes before serving
for the best texture and flavor.
Freezer:
These nests freeze surprisingly well.
Place in a single layer on a baking sheet,
freeze until solid, then transfer
to a freezer-safe container
with parchment between layers.
Freeze for up to 2 months.
Thaw at room temperature for 20–30 minutes before serving.
Note: The mini eggs may develop
slight sugar bloom on the surface
after refrigeration —
this is purely cosmetic
and has no effect on flavor.
Frequently Asked Questions
Can I make these ahead of time?
Absolutely — and it’s recommended.
These nests can be made 2–3 days
before your Easter celebration
and stored in an airtight container.
They actually taste better
on day two as the flavors meld.
What if my chocolate mixture is too thick to coat the cereal?
This happens if the mixture cools
before being added to the cereal.
Return the bowl to the microwave
for 15–20 seconds and stir again —
it will loosen immediately.
Can I use Robin Eggs instead of Cadbury Mini Eggs?
Yes — Whoppers Robin Eggs
or any malted milk egg candy
works beautifully and adds
a slightly different flavor profile
with the malted milk center.
Why won’t my nests hold their shape?
Usually caused by the mixture
being too warm when shaped,
or not enough chocolate to bind the cereal.
If the mixture feels too loose,
refrigerate the bowl for 5 minutes
before continuing to shape.
Can I double the recipe?
Easily. Double all ingredients proportionally.
Work in two batches for the mixing step
to maintain better control
over coating and shaping.
Final Thoughts
Chocolate Bird Nest Treats are the kind of recipe
that earns a permanent place
in every family’s Easter tradition —
not because they’re complicated
or impressive in technique,
but because they’re genuinely joyful to make
and genuinely delicious to eat.
They bring together the best elements
of a great holiday recipe:
they’re beautiful without being difficult,
they involve everyone including the youngest helpers,
they require nothing more than a microwave
and a handful of pantry staples,
and they produce something that looks
like it came from a specialty Easter shop.
Make them this Easter.
Make them with your kids,
your grandchildren, your friends.
Put them on your table and watch
the way people smile when they see them.
Some recipes are just about food.
These ones are about moments —
and those are always worth making.